Xylophone
It's hard to believe that using technology to record and play back music only dates back to 1878, when Edison patented the phonograph. We've come so far since then-with music synthesizers, CDs, sampling and remixing, phones that play music, and even long-distance jamming over the Internet. In this chapter, you'll take part in this tradition by building a Xylophone app that records and plays music.
What You'll Build
With the app shown in Figure 9-1 (originally created by Liz Looney of the App Inventor team), you can:
- Play eight different notes by touching colored buttons on the screen.
- Press a Play button to replay the notes you played earlier.
- Press a Reset button to make the app forget what notes you played earlier so you can enter a newsong.
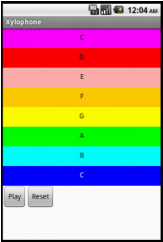
Figure 9-1. The Xylophone app UI
What You'll Learn
This tutorial covers the following concepts:
- Using a single Sound component to play different audio files.
- Using the Clock component to measure and enforce delays between actions.
- Deciding when to create a procedure.
- Creating a procedure that calls itself.
- Advanced use of lists, including adding items, accessing them, and clearing the list.
Getting Started
Connect to the App Inventor website and start a new project. Name it "Xylophone", and also set the screen’s title to "Xylophone". Open the Blocks Editor and connect to your phone or emulator.
Designing the Components
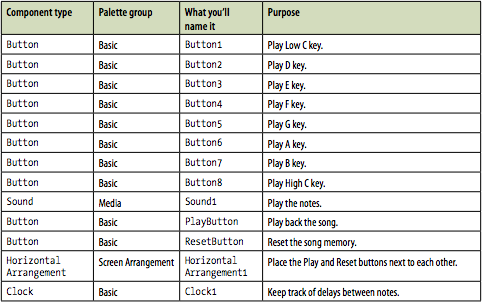
This app has 13 different components (8 of which compose the keyboard), listed in Table 9-1. Since there are so many, it would get pretty boring to create all of them before starting to write our program, so we'll break down the app into its functional parts and build them sequentially by going back and forth between the Designer and the Blocks Editor, as we did with the Ladybug Chase app in Chapter 5.
Table 9-1. All of the components for the Xylophone app
Creating the Keyboard
Our user interface will include an eight-note keyboard for a pentatonic (seven-note) major scale ranging from Low C to High C. We will create this musical keyboard in this section.
Creating the First Note Buttons
Start by creating the first two xylophone keys, which we will implement as buttons.
- From the Basic category, drag a Button onto the screen. Leave its name as Button1. We want it to be a long magenta bar, like a key on a xylophone, so set its properties as follows:
- Changing its BackgroundColor property to Magenta.
- Changing its Text property to "C".
- Setting its Width property to "Fill parent" so it goes all the way across the screen.
- Setting its Height property to 40 pixels.
- Repeat for a second Button, named Button2, placing it below Button1. Use Width and Height property values, but set its BackgroundColor property to Red and its Text property to "D".
(Later, we will repeat step 2 for six more note buttons.)
The view in the Component Designer should look something like Figure 9-2.
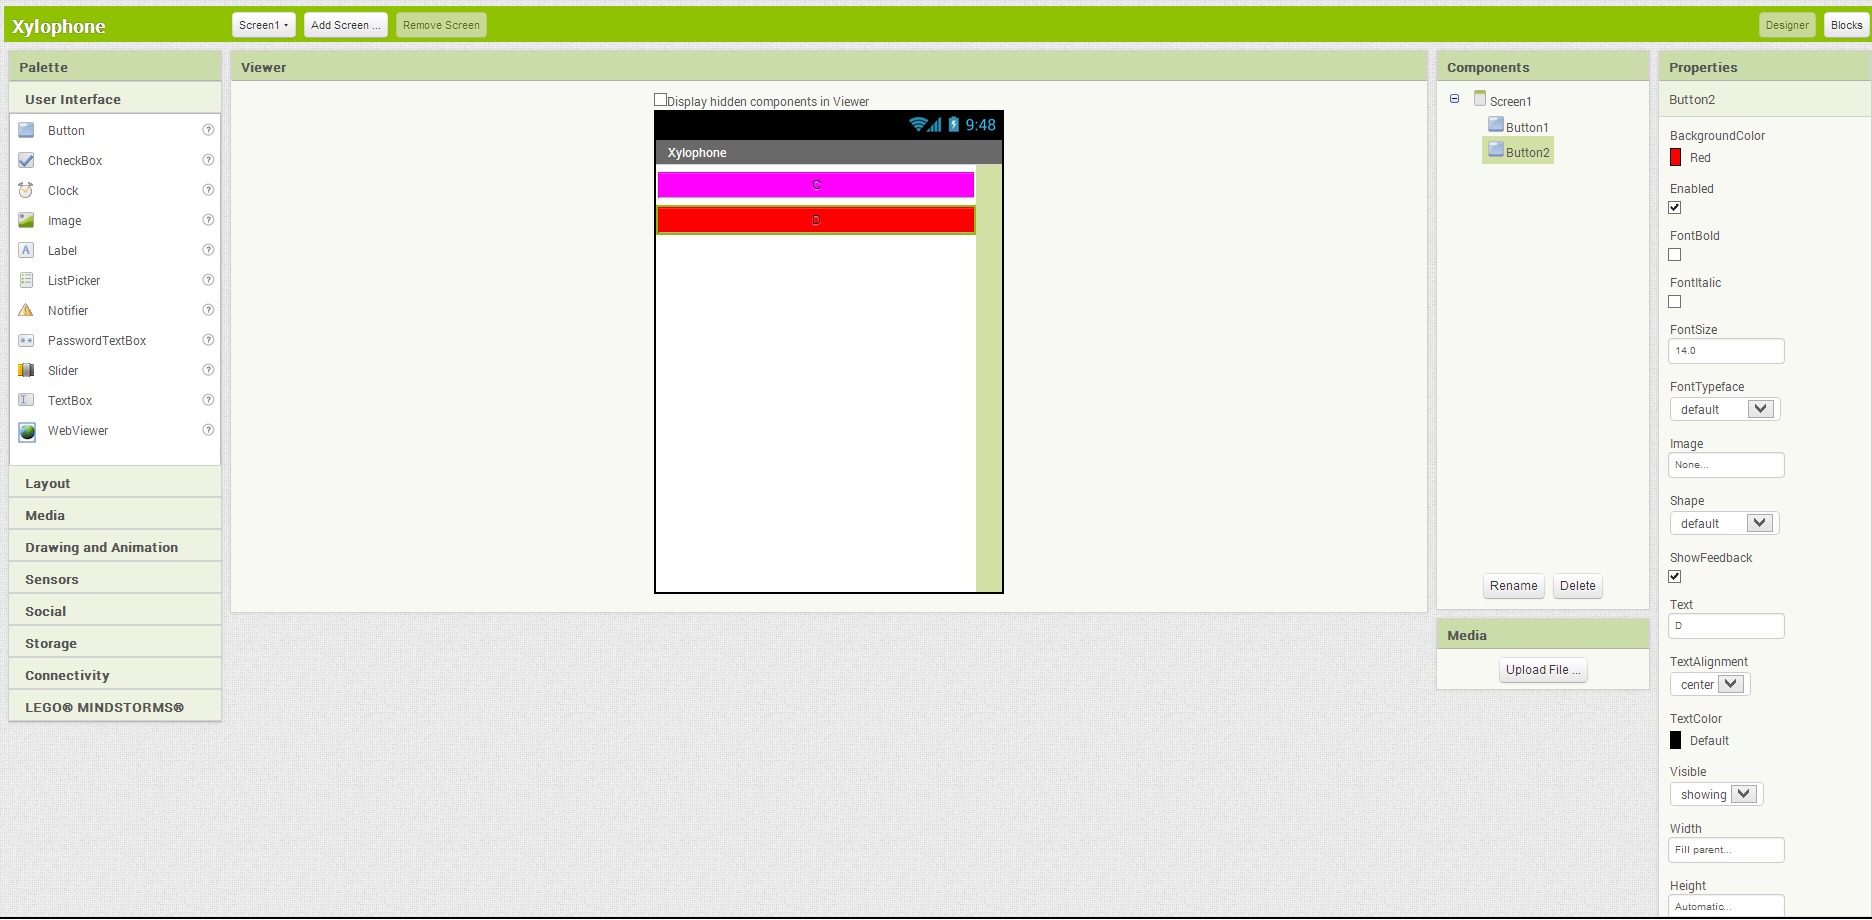
Figure 9-2. Placing buttons to create a keyboard
The display on your phone should look similar, although there will not be any empty space between the two colored buttons.
Adding the Sound Component
We can't have a xylophone without sounds, so create a Sound component, leaving its name as Sound1. Change the MinimumInterval property from its default value of 500 milliseconds to 0. This allows us to play the sound as often as we want, instead of having to wait half a second (500 milliseconds) between plays. Don’t set its Source property, which we will set in the Blocks Editor.
Upload the sound files 1.wav and 2.wav by clicking the sound link. Unlike in previous chapters, where it was OK to change the names of media files, it is important to use these exact names for reasons that will soon become clear. You can upload the remaining six sound files when directed to later.
Connecting the Sounds to the Buttons
The behavior we need to program is for a sound file to play when the corresponding button is clicked. Specifically, if Button1 is clicked, we'd like to play 1.wav; if Button2 is clicked, we'd like to play 2.wav; and so on. We can set this up in the Blocks Editor as shown in Figure 9-3 by doing the following:
- From the My Blocks tab and Button1 drawer, drag out the Button1.Click block.
- From the Sound1 drawer, drag out the set Sound1.Source block, placing it in the Button1.Click block.
- Type "text" to create a text block. (This is quicker than going to the Built-In tab and then the Text drawer, although that would work too.) Set its text value to "1.wav" and place it in the Sound1.Source block.
- Add a Sound1.Play block.
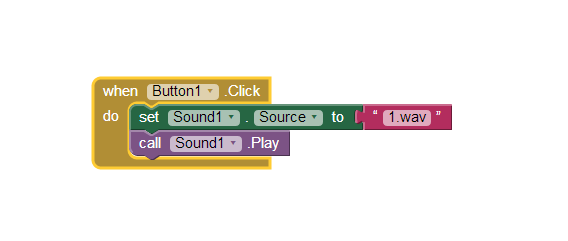
Figure 9-3. Playing a sound when a button is clicked
We could do the same for Button2, as shown in Figure 9-4 (just changing the text value), but the code would be awfully repetitive.

Figure 9-4. Adding more sounds
Repeated code is a good sign that you should create a procedure, which you've already done in Chapter 3’s MoleMash game and Chapter 5’s Ladybug Chase game. Specifically, we'll create a procedure that takes a number as an argument, sets Sound1's Source to the appropriate file, and plays the sound. This is another example of refactoring-improving a program’s implementation without changing its behavior, a concept introduced in the MoleMash tutorial. We can use the Text drawer's join block to combine the number (e.g., 1) and the text ".wav" to create the proper filename (e.g., "1.wav"). Here are the steps for creating the procedure we need:
- Under the Built-In tab, go to the Definition drawer and drag out the to procedure block.
- Go back to the Definition drawer and drag a name block into the "arg" socket of to procedure.
- Click the rightmost "name" and set the name to "number".
- Click procedure and set the name to "PlayNote".
- Drag the Sound1.Source block from Button1.Click into PlayNote to the right of the word "do". The Sound1.Play block will move with it.
- Drag the 1.wav block into the trash can.
- From the Text drawer, drag the join block into Sound1.Source's socket.
- Type "number" and move it to the left socket of the join block (if it is not already there).
- From the Text drawer, drag the text block into the right socket of the join block.
- Change the text value to ".wav". (Remember not to type the quotation marks.)
- Under the My Blocks tab, go to the My Definitions drawer and drag a call PlayNote block into the empty body of Button1.Click.
- Type "1" and put it in the "number" socket.
Now, when Button1 is clicked, the procedure PlayNote will be called, with its number argument having the value 1. It should set Sound1.Source to "1.wav" and play the sound.
Create a similar Button2.Click block with a call to PlayNote with an argument of 2.(You can copy the existing PlayNote block and move it into the body of Button2.Click, making sure to change the argument.) Your program should look like Figure 9-5.
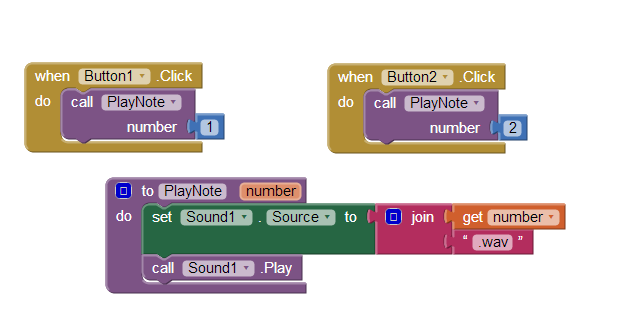
Figure 9-5. Creating a procedure to play a note
Telling Android to Load the Sounds
If you tried out the preceding calls to PlayNote, you may have been disappointed by not hearing the sound you expected or by experiencing an unexpected delay. That's because Android needs to load sounds at runtime, which takes time, before they can be played. This issue didn't come up before, because filenames placed in a Soundcomponent’s Source property in the Designer are automatically loaded when the program starts. Since we don’t set Sound1.Source until after the program has started, that initialization process does not take place. We have to explicitly load the sounds when the program starts up, as shown in Figure 9-6.
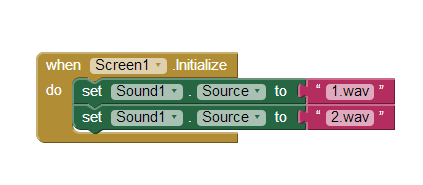 Figure 9-6. Loading sounds when the app launches

Test your app. Now if you restart the app by clicking on "Connect to Device..." in the Blocks Editor, the notes should play without delay. (If you don’t hear anything, make sure that the media volume on your phone is not set to mute.)
Implementing the Remaining Notes
Now that we have the first two buttons and notes implemented and working, add the remaining six notes by going back to the Designer and uploading the sound files 3.wav, 4.wav, 5.wav, 6.wav, 7.wav, and 8.wav. Then create six new buttons, following the same steps as you did before but setting their Text and BackgroundColor properties as follows:
- Button3 ("E", Pink)
- Button4 ("F", Orange)
- Button5 ("G", Yellow)
- Button6 ("A", Green)
- Button7 ("B", Cyan)
- Button8 ("C", Blue)
You may also want to change Button8’s TextColor property to White, as shown in Figure 9-7, so it is more legible.
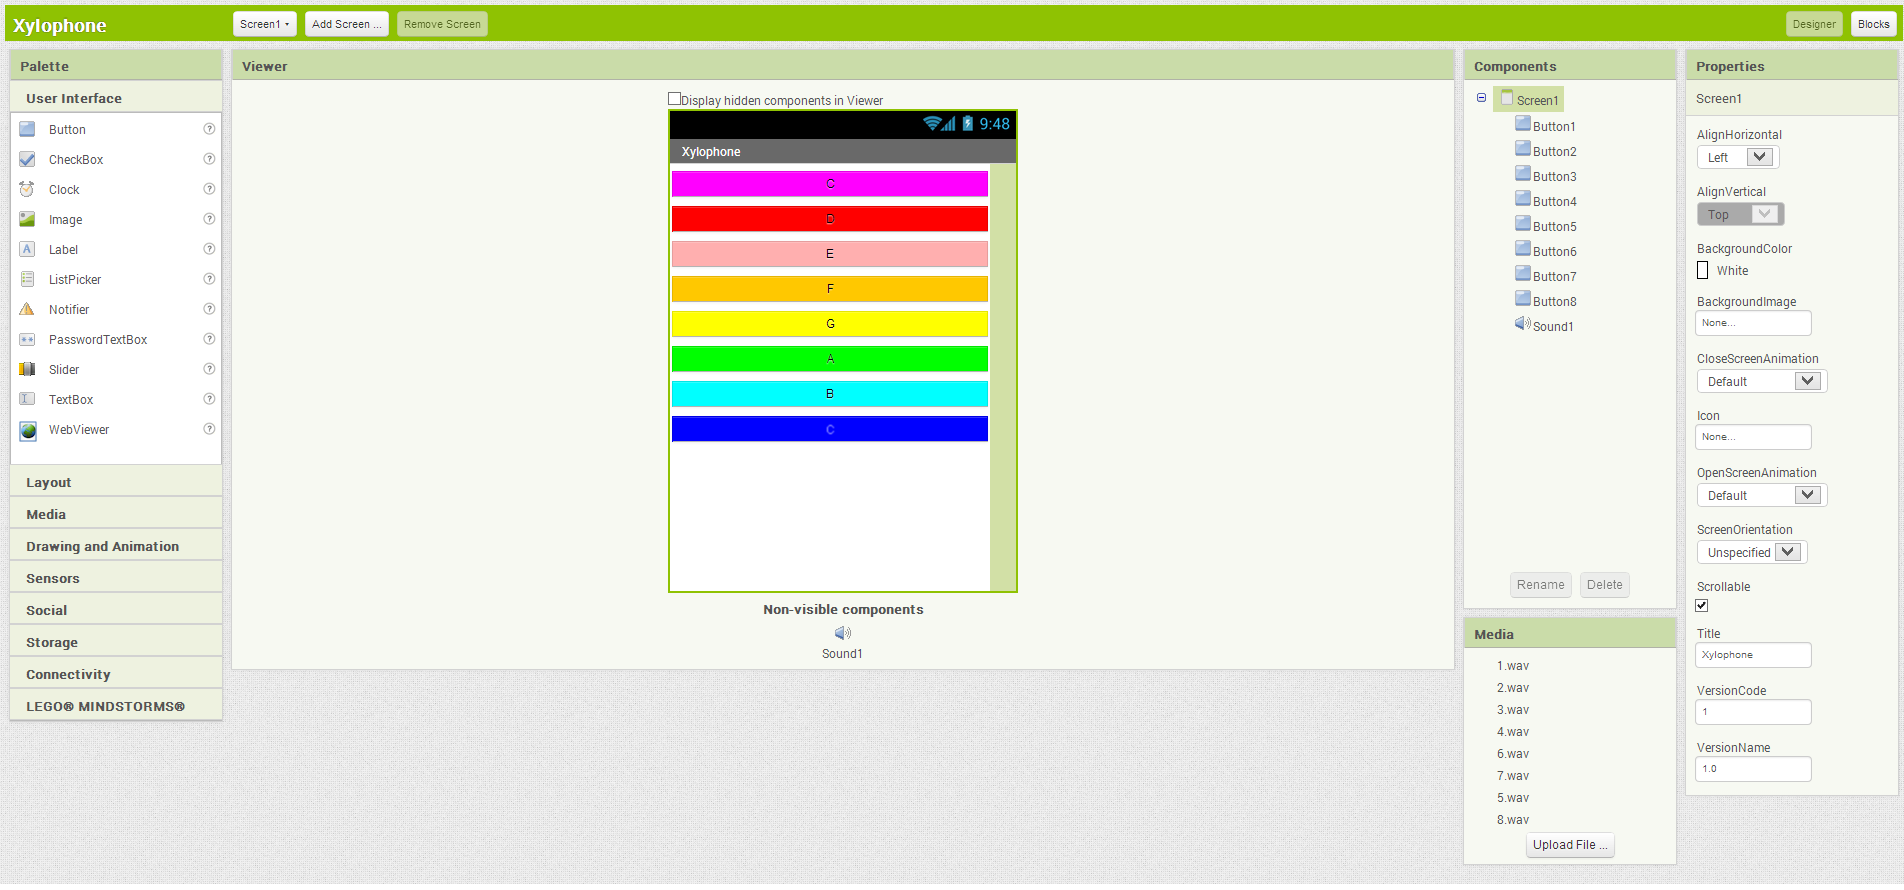 Figure 9-7. Putting the remaining buttons and sounds in the Component Designer
Back in the Blocks Editor, create Click blocks for each of the new buttons with appropriate calls to PlayNote. Similarly, add each new sound file to Screen.Initialize, as shown in Figure 9-8.
With your program getting so large, you might find it helpful to click the white minus signs near the bottom of the "container" blocks, such as PlayNote, to minimize them and conserve screen space.

Test your app. You should now have all the buttons, and each one will play a different note when you click it.
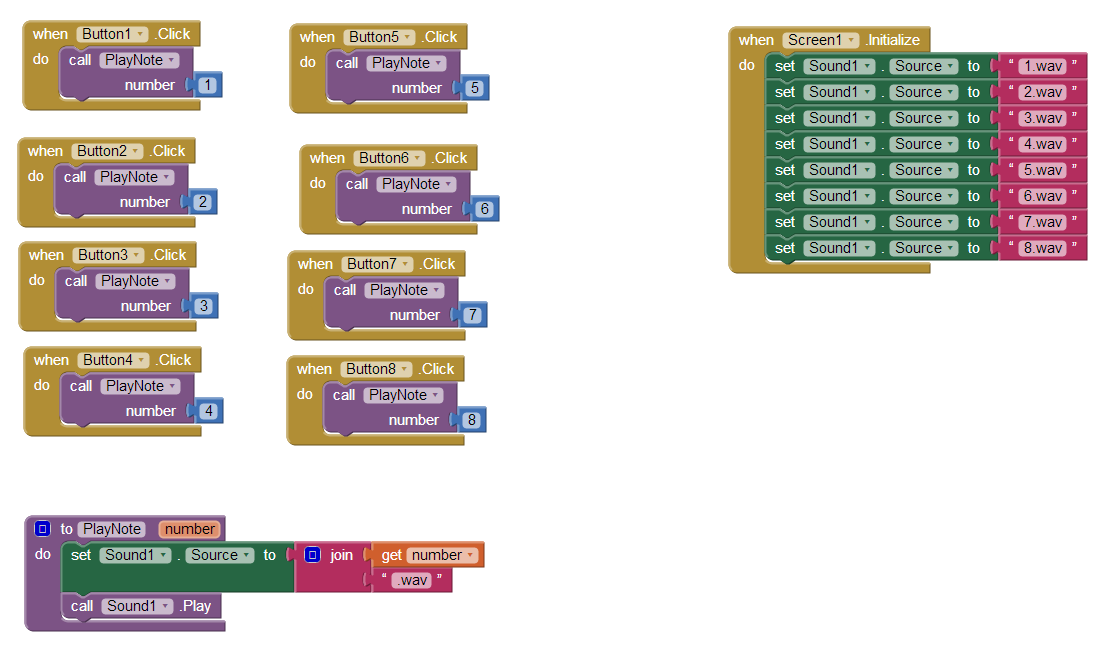 Figure 9-8. Programming the button click events to correspond to all the keyboard keys
Recording and Playing Back Notes
Playing notes by pressing buttons is fun, but being able to record and play back songs is even better. To implement playback, we will need to maintain a record of played notes. In addition to remembering the pitches (sound files) that were played, we must also record the amount of time between notes, or we won't be able to distinguish between two notes played in quick succession and two played with a 10-second silence between them.
Our app will maintain two lists, each of which will have one entry for each note that has been played:
- notes, which will contain the names of the sound files in the order in which they were played
- times, which will record the points in time at which the notes were played

Note. Before continuing, you may wish to review lists, which we covered in the Presidents Quiz.
We can get the timing information from a Clock component, which we will also use to properly time the notes for playback.
Adding the Components
In the Designer, you will need to add a Clock component and Play and Reset buttons, which we will put in a HorizontalArrangement:
- Drag in a Clock component. It will appear in the "Non-visible components" section. Uncheck its TimerEnabled property because we don’t want its timer to go off until we tell it to during playback.
- Go to the Screen Arrangement category and drag a HorizontalArrangement component beneath the existing button. Set its Width property to "Fill parent."
- From the Basic category, drag in a Button. Rename it PlayButton and set its Text property to "Play".
- Drag in another Button, placing it to the right of PlayButton. Rename the new Button to ResetButton and set its Text property to "Reset".
The Designer view should look like Figure 9-9.
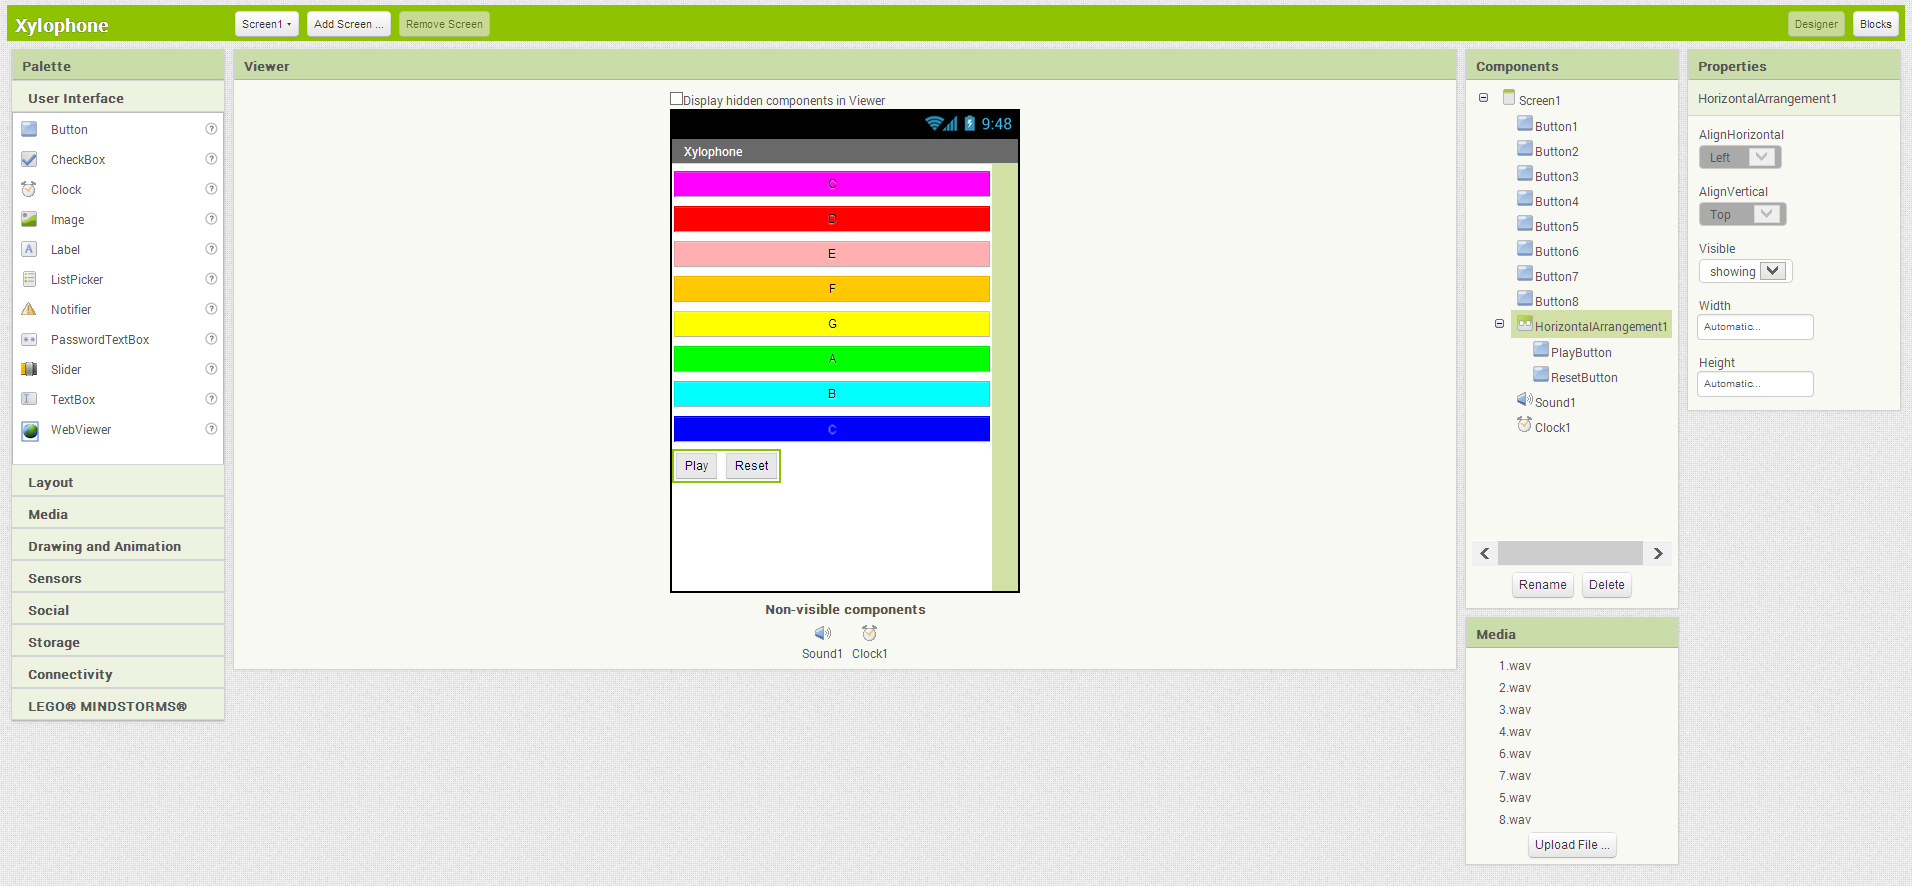 Figure 9-9. Adding components for recording and playing back sounds
Recording Notes and Times
We now need to add the correct behavior in the Blocks Editor. We will need to maintain lists of notes and times and add to the lists whenever the user presses a button.
- Create a new variable by going to the Built-In tab and dragging out a def variable block from the Definition drawer.
- Click "variable" and change it to "notes".
- Open the Lists drawer and drag a make a list block out, placing it in the socket of def notes.
This defines a new variable named "notes" to be an empty list. Repeat the steps for another variable, which you should name "times". These new blocks should look like Figure 9-10.
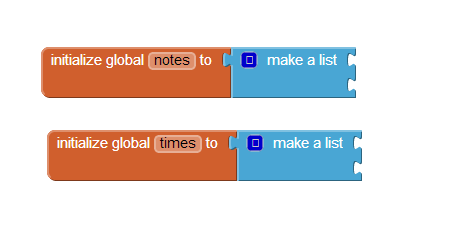 Figure 9-10. Setting the variables to record notes
How the blocks work
Whenever a note is played, we need to save both the name of the sound file (to the list notes) and the instant in time at which it was played (to the list times). To record the instant in time, we will use the Clock1.Now block, which returns the current instant in time (e.g., March 12, 2011, 8:33:14 AM), to the nearest millisecond. These values, obtained through the Sound1.Source and Clock1.Now blocks, should be added to the lists notes and times, respectively, as shown in Figure 9-11.
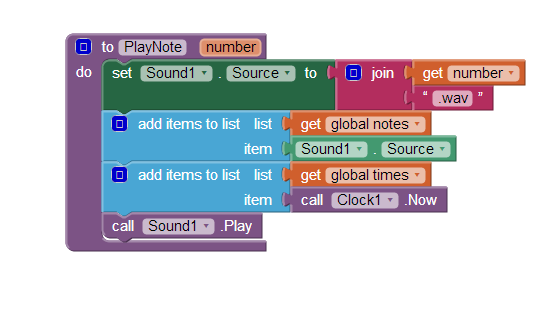 Figure 9-11. Adding the sounds played to the list
For example, if you play "Row, Row, Row Your Boat" [C C C D E], your lists would end up having five entries, which might be:
- notes: 1.wav, 1.wav, 1.wav, 2.wav, 3.wav
- times [dates omitted]: 12:00:01, 12:00:02, 12:00:03, 12:00:03.5, 12:00:04
When the user presses the Reset button, we want the two lists to go back to their original, empty states. Since the user won’t see any change, it's nice to add a small Sound1.Vibrate block so he knows that the key click was registered. Figure 9-12 shows the blocks for this behavior.
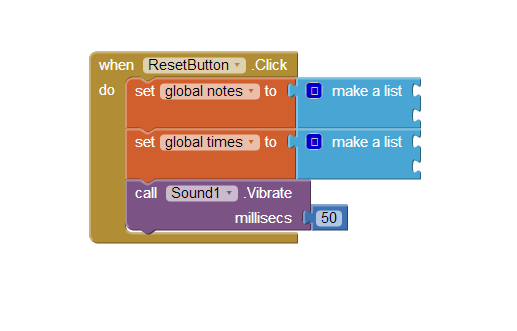 Figure 9-12. Providing feedback when the user resets the app
Playing Back Notes
As a thought experiment, let's first look at how to implement note playback without worrying about timing. We could (but won't) do this by creating these blocks as shown in Figure 9-13:
- A variable count to keep track of which note we're on.
- A new procedure, PlayBackNote, which plays that note and moves on to the next one.
- Code to run when PlayButton is pressed that sets the count to 1 and calls PlayBackNote unless there are no saved notes.
How the blocks work
This may be the first time you've seen a procedure make a call to itself. While at first glance this might seem bogus, it is in fact an important and powerful computer science concept called recursion.
To get a better idea of how recursion works, let's step through what happens if a user plays three notes (1.wav, 3.wav, and 6.wav) and then presses the Play button. First, PlayButton.Click starts running. Since the length of the list notes is 3, which is greater than 0, count gets set to 1, and PlayBackNote is called:
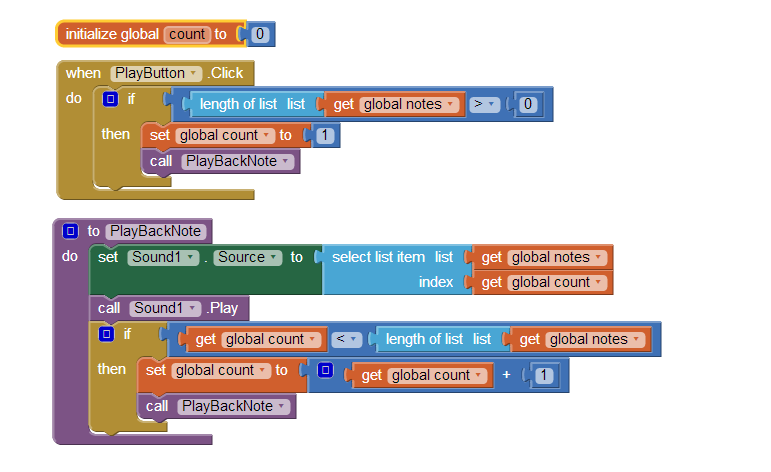 Figure 9-13. Playing back the recorded notes
- The second time PlayBackNote is called, count = 2:
- Sound1.Source is set to the second item in notes, which is 3.wav.
- Sound1.Play is called, playing this note.
- Since count (2) less than the length of notes (3), count gets incremented to 3, and PlayBackNote gets called again.
- The third time PlayBackNote is called, count = 3:
- Sound1.Source is set to the third item in notes, which is 6.wav.
- Sound1.Play is called, playing this note.
- Since count (3) is not less than the length of notes (3), nothing else happens, and playback is complete.

Note. Although recursion is powerful, it can also be dangerous. As a thought experiment, ask yourself what would have happened if the programmer forgot to insert the blocks in PlayBackNote that incremented count.
While the recursion is correct, there is a different problem with the preceding example: almost no time passes between one call to Sound1.Play and the next, so each note gets interrupted by the next note, except for the last one. No note (except for the last) is allowed to complete before Sound1’s source is changed and Sound1.Play is called again. To get the correct behavior, we need to implement a delay between calls to PlayBackNote.
Playing Back Notes with Proper Delays
We will implement the delay by setting the timer on the clock to the amount of time between the current note and the next note. For example, if the next note is played 3,000 milliseconds (3 seconds) after the current note, we will set Clock1.TimerInterval to 3,000, after which PlayBackNote should be called again. Make the changes shown in Figure 9-14 to the body of the if block in PlayBackNote, and create and fill in the Clock1.Timer event handler, which says what should happen when the timer goes off.
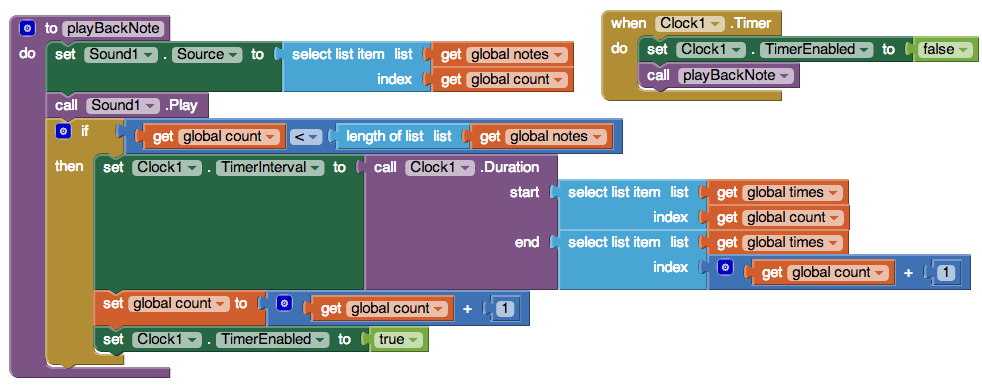 Figure 9-14. Adding delays between the notes
How the blocks work
Let's assume the following contents for the two lists:
- notes: 1.wav, 3.wav, 6.wav
- times: 12:00:00, 12:00:01, 12:00:04
As Figure 9-14 shows, PlayButton.Click sets count to 1 and calls PlayBackNote.
- The first time PlayBackNote is called, count = 1:
- Sound1.Source is set to the first item in notes, which is "1.wav".
- Sound1.Play is called, playing this note.
- Since count (1) less than the length of notes (3), Clock1.TimerInterval is set to the amount of time between the first (12:00:00) and second items in times(12:00:01): 1 second. count gets incremented to 2. Clock1.Timer is enabled and starts counting down.
- Nothing else happens for 1 second, at which time Clock1.Timer runs, temporarily disabling the timer and calling PlayBackNote.
- The second time PlayBackNote is called, count = 2:
- Sound1.Source is set to the second item in notes, which is "3.wav".
- Sound1.Play is called, playing this note.
- Since count (2) less than the length of notes (3), Clock1.TimerInterval is set to the amount of time between the second (12:00:01) and third items in times(12:00:04): 3 seconds. count gets incremented to 3. Clock1.Timer is enabled and starts counting down.
- The third time PlayBackNote is called, count = 3:
- Sound1.Source is set to the third item in notes, which is "6.wav".
- Sound1.Play is called, playing this note.
- Since count (3) is not less than the length of notes (3), nothing else happens. Playback is complete.
Variations
Here are some alternative scenarios to explore:
- Currently, there's nothing to stop a user from clicking ResetButton during playback, which will cause the program to crash. (Can you figure out why?) Modify PlayButton.Click so it disables ResetButton. To reenable it when the song is complete, change the if block in PlayButton.Click into an ifelse block, and reenable ResetButton in the “else” portion.
- Similarly, the user can currently click PlayButton while a song is already playing. (Can you figure out what will happen if she does so?) Make it so PlayButton.Clickdisables PlayButton and changes its text to "Playing…"" You can reenable it and reset the text in an ifelse block, as described in the previous bullet.
- Add a button with the name of a song, such as "Für Elise". If the user clicks it, populate the notes and times lists with the corresponding values, set count to 1, and call PlayBackNote. To set the appropriate times, you'll find the Clock1.MakeInstantFromMillis block useful.
- If the user presses a note, goes away and does something else, and comes back hours later and presses an additional note, the notes will be part of the same song, which is probably not what the user intended. Improve the program by (1)stopping recording after some reasonable interval of time, such as a minute; or (2) putting a limit on the amount of time used for Clock1.TimerInterval using the max block from the Math drawer.
- Visually indicate which note is playing by changing the appearance of the button—for example, by changing its Text, BackgroundColor, or ForegroundColor.
Summary
Here are some of the ideas we’ve covered in this tutorial:
- You can play different audio files from a single Sound component by changing its Source property. This enabled us to have one Sound component instead of eight. Just be sure to load the sounds at initialization to prevent delays (Figure 9-6).
- Lists can provide a program with memory, with a record of user actions stored in the list and later retrieved and reprocessed. We used this functionality to record and play back a song.
- The Clock component can be used to determine the current time. Subtracting two time values gives us the amount of time between two events.
- The Clock's TimerInterval property can be set within the program, such as how we set it to the duration of time between the starts of two notes.
- It is not only possible but sometimes desirable for a procedure to make a call to itself. This is a powerful technique called recursion. When writing a recursive procedure, make sure that there is a base case in which the procedure ends, rather than calling itself, or the program will loop infinitely.
- 파일다운 : 1.wav 2.wav 3.wav 4.wav 5.wav 6.wav 7.wav 8.wav
 [앱인벤터] 위치센서 LocationSensor를 이용한 거리측정기
 [앱인벤터] Sound를 이용한 실로폰 앱